Tracks & Assets
Last updated 9 days ago
The Tracks & Assets tab shows all information relative to the volumes and tracks of your release.
You can edit the number of volumes and tracks at any moment, by clicking on the "Edit" button under the tab's title:
By default, the track-list only shows necessary information for audio upload (track title, main artist, ISRC, master type, master duration) but you can display additional information for each track, by clicking on the "Show details" link.
You are also able to reorder your volumes and tracks as much as you want, using the cross-hair cursor that appears on the left when you move your cursor over a volume or a track.
Add a Track
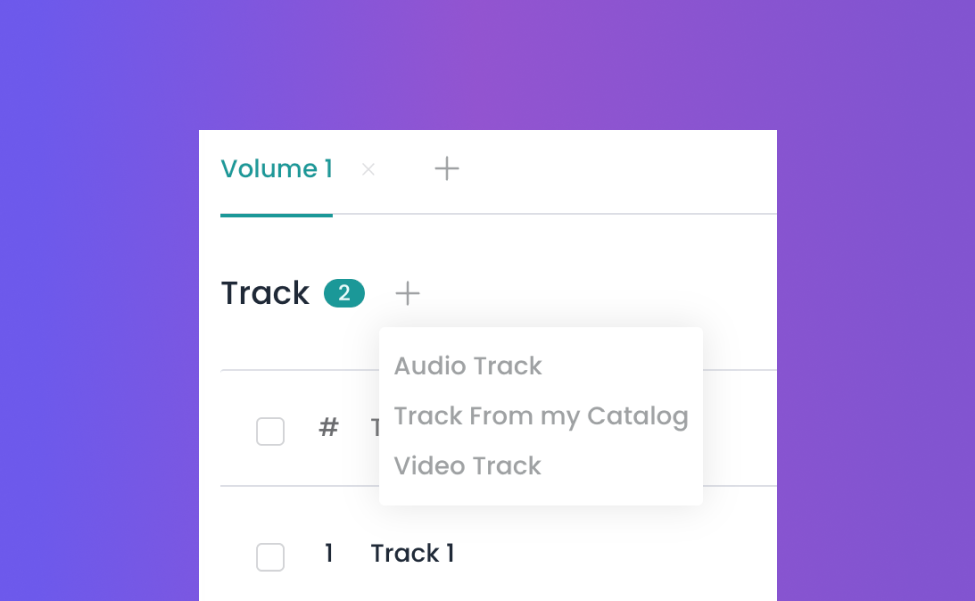
At the top of the tracklist, clicking on the + (add) symbol allows you to add a new track with 3 distinct options :
- "Audio track" to add a brand new audio track. Clicking on it will add a track at the end of the volume's tracklist and which can be edited by clicking on it.
- "Track From my Catalog" to search a track within your catalog database and add it to the end of the tracklist with all its pre-existing details.
- "Video Track" to add a brand new video track. Clicking on it will add a video track at the end of the volume's tracklist and which can be edited by clicking on it.
Edit a Track
To edit a track, click on the track.
A panel will then be displayed on the right to fill in the details of this specific track.
Additional contributors can be added with the "+ Add New Contributor" button of the Contributors section.
Some of the details in the Information section can be easily duplicated on all the product's tracks by clicking on the "Duplicate" button located at the top right corner of the corresponding field. Contributors can also easily be credited on all the product's tracks by clicking on the "+ Apply artist on all tracks" button located on the left end of the corresponding field.
ISRC Conflicts
Only users with distributor rights are able to perform the actions described below.
Users with label-only rights need to get in touch with their distributors to request assistance for the resolution of ISRC conflicts.
Because of international ISRC guidelines, two tracks with two different track titles cannot be associated with the same ISRC.
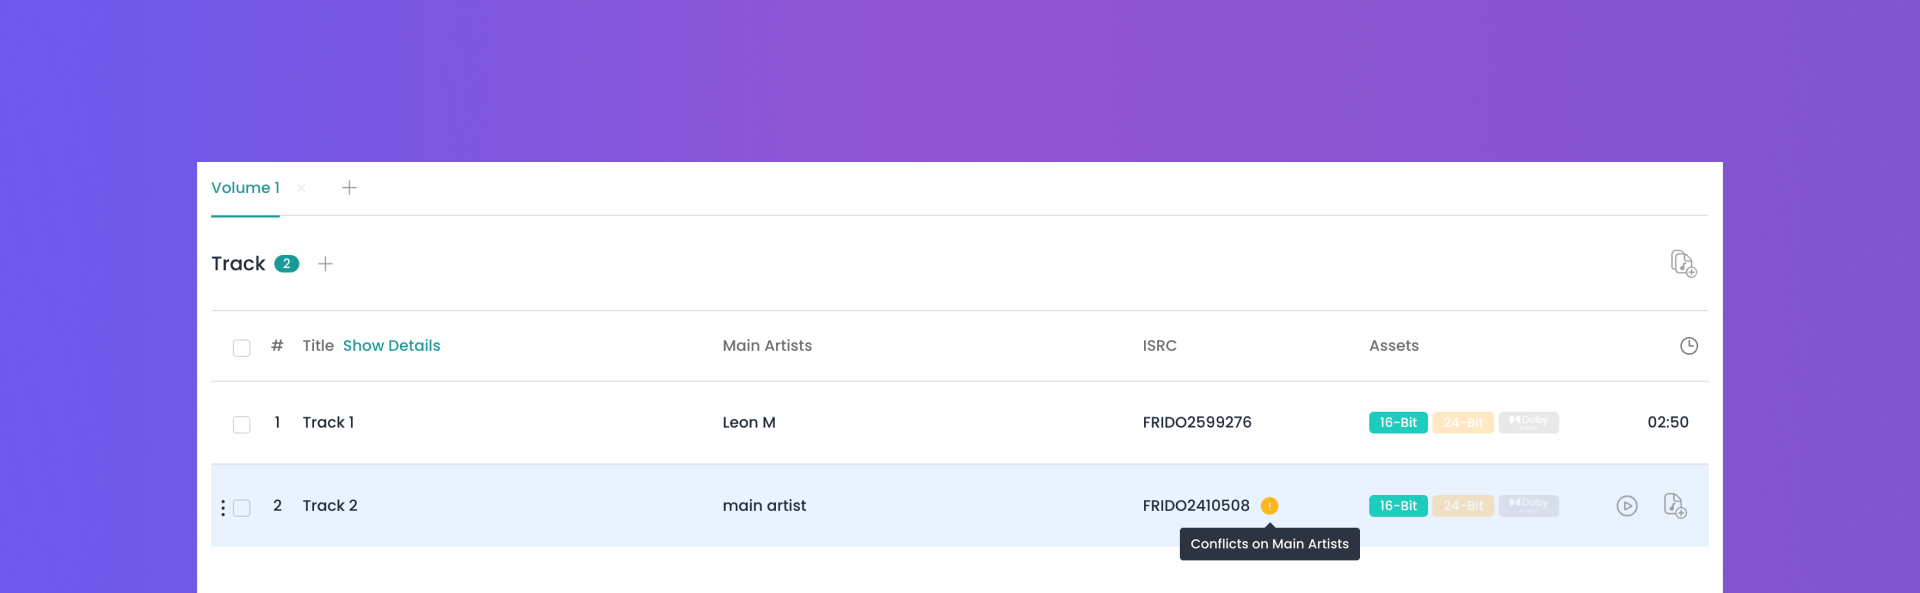
Following that principle, tracks sharing a common ISRC but bearing different track titles will automatically be flagged as an ISRC Conflict in the product creation funnel, preventing the product’s status from being switched to ‘Active’.
ISRC conflict flagged in the product creation funnel:
Clicking on the track will open the usual side panel with all the track details and additional precisions about the ISRC conflict displayed at the top, including the exhaustive list of the tracks affected by the conflict and the releases they are featured on.
Track details side panel with the list of the tracks featured on other products and affected by the ISRC conflict:
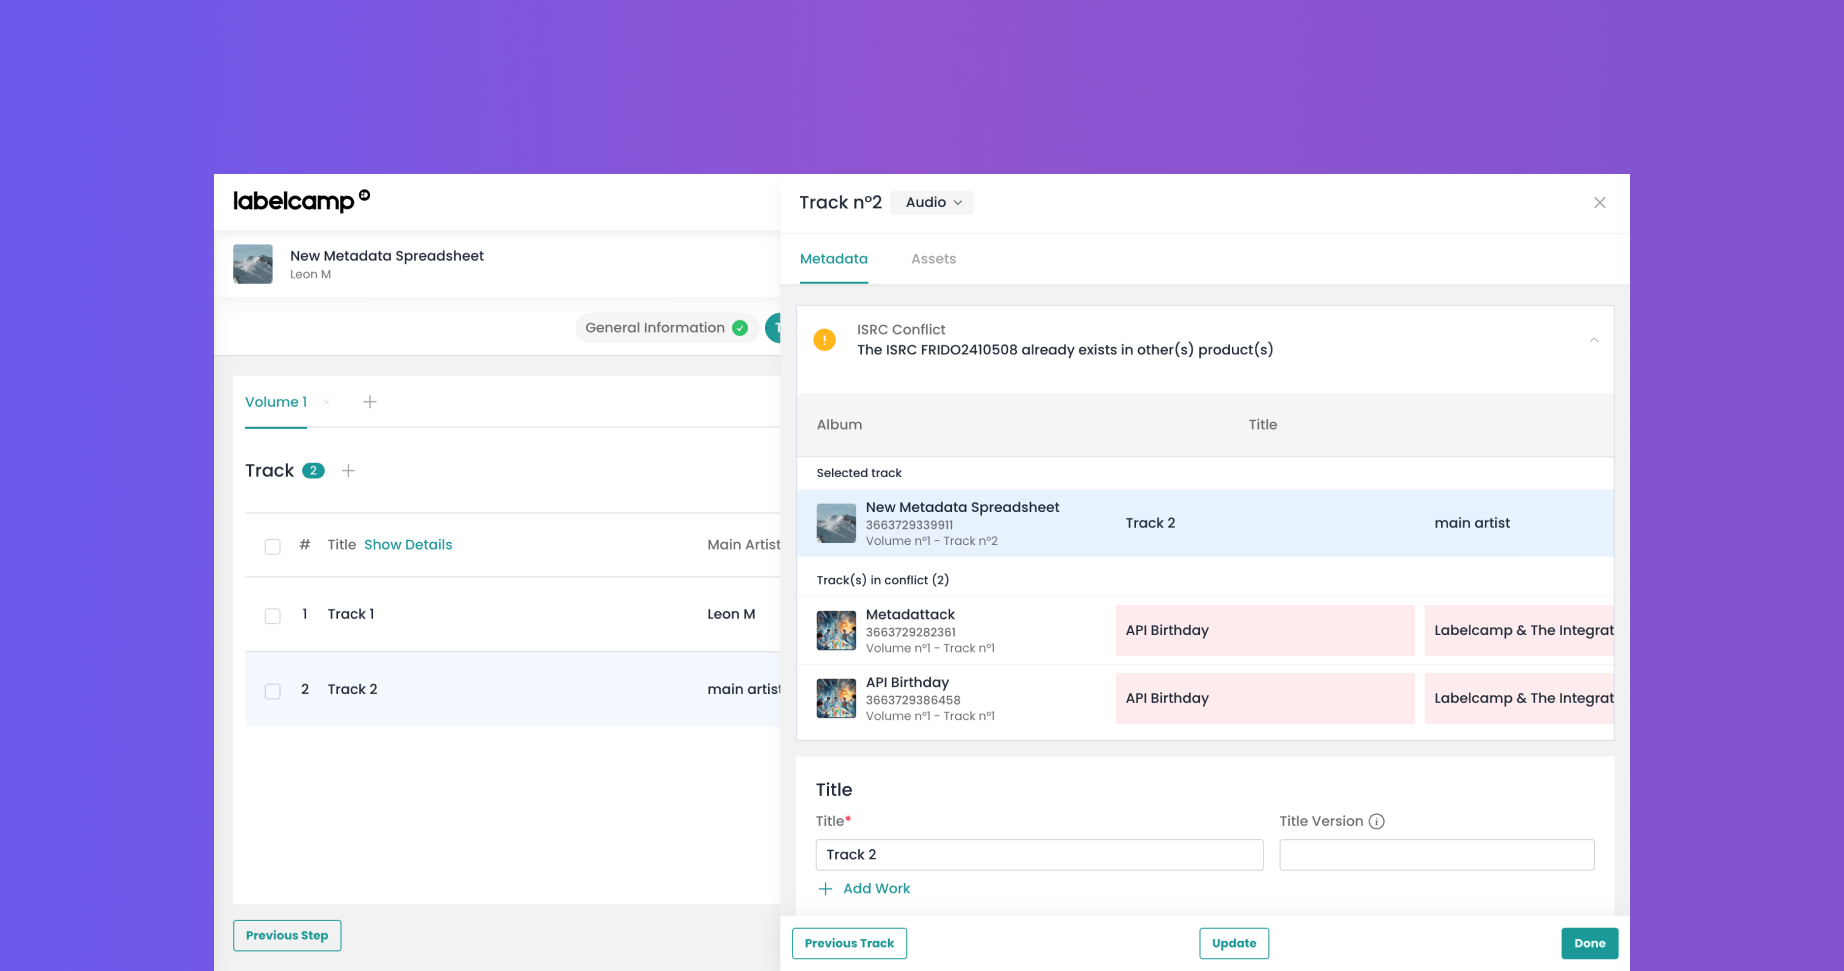
This list can be used to manually solve the conflict by updating either the Track Titles or ISRCs in the relevant products’ tracklists.
Alternatively, the ‘Apply this title’ link can also be used to quickly update the title of all the tracks affected by the conflict, with the title of the track currently displayed.
The ‘Apply this title’ button will rename the conflicting track ‘First’ with the title ‘API Birthday’ to solve the conflict:

Different Title Versions associated with a common ISRC will not trigger an ISRC conflict in Labelcamp, only different track Titles.
Delete a Track
You can select one or multiple tracks to delete by ticking the box in front of each track number. Then you will simply have to click on the "Delete" button displayed at the bottom of the page.
To delete an entire volume, you simply have to click on the "x" icon on the left end of the Volume title and confirm the deletion.
Import Audio
Required audio format
Your audio files have to match certain requirements to be validated during the import:
Your files have to be masters coming from your recording studio or exact copies of these masters
Your files should not be compressed (no MP3 or similar)
Accepted file extensions: WAV, AIFF, or FLAC
Accepted audio formats: 16-bit, 24-bit, Immersive Audio, Apple Digital Masters
Mono audio files are not accepted.
Batch Upload
If you are uploading an entire volume, your files should be numbered in the correct order, as follows:
01_aaa.wav, 02_bbb.wav, 03_ccc.wav, etc.
01-aaa.wav, 02-bbb.wav, 03-ccc.wav, etc.
01.aaa.wav, 02.bbb.wav, 03.ccc.wav, etc.
01 aaa.wav, 02 bbb.wav, 03 ccc.wav, etc.
Process
Once you have all the information you need, you can either add audio for an entire volume at once, or track by track.
For a volume :
Click on the "Batch Upload" button of the relevant volume
Choose the audio master type (16-bit, 24-bit, or immersive)
Choose the location of the tracks on your computer
For a track :
Click on the "Upload Audio" button of the relevant track
Choose the location of your track on your computer.
Audio import progress
When your audio import launches correctly, a tracking task shows at the right of the track and allows you to see the progression of your import in real time.
Once the audio has been successfully imported and processed, the duration of the audio file and the master type (16-bit, 24-bit, Dolby Atmos) will be displayed in the relevant columns.
Once the audio import is done, a green box will appear at the top of your screen indicating you will receive an email confirming the outcome of your import.
Audio assets must not exceed 50GB per file.
Audio masters specifications
Labelcamp supports various types of audio masters, which can be uploaded to Labelcamp both through the user interface or the API. Uploading audio masters compliant with the requirements detailed below will ensure that they are uploaded, processed and delivered to DSPs as expected.
General requirements
Audio files uploaded to Labelcamp must be mastered files provided by a mastering studio, or exact copies of such master files.
Audio files should never be upsampled files (i.e. 16-bit files converted to 24-bit files, mp3 files converted to 16-bit files, etc.). Such files will be identified and rejected by most DSPs.
If different master files are uploaded for a single track, they must be identical in both structure (i.e. silences, fade in and out, etc.) and duration, with a maximum tolerated margin of 4.00 sec.
For 16-bit and 24-bit masters uploaded through the API, the FLAC format is highly recommended as using this lighter yet lossless format will result in a smaller consumption of bandwidth and a quicker upload and processing of the master file. (nb : All audio files uploaded to Labelcamp are converted to FLAC for storage.)
16-bit audio
Required specs for 24-bit audio masters :
2-channel mastered stereo files
Bit depth : 16-bit
Minimum sample rate : 44.1 kHz
Format : WAV, AIFF or FLAC
24-bit audio
Required specs for 24-bit audio masters :
2-channel mastered stereo files
Bit depth : 24-bit
Accepted sample rates : 44.1 kHz / 48 kHz / 88,2 kHz / 96 kHz / 176,4 kHz / 192 kHz
Format : WAV, AIFF or FLAC
Immersive Audio - Dolby Atmos
Immersive Dolby Atmos masters are supported by our Labelcamp app and can be uploaded to any track, following the same upload method used for the standard and mandatory stereo master file of the track.
Dolby Atmos master files must be multi-channel audio masters, mastered in a mastering studio supporting this technology.
Dolby Atmos files uploaded through Labelcamp’s user interface should have a .wav extension.
For API uploads, a .zip extension is also allowed for a quicker upload (API documentation available here).
Dolby Atmos masters can only be delivered to platforms supporting this type of immersive audio format.
If you have any questions about Dolby Atmos or wish to start delivering them to DSPs, distributors can get in touch with the Labelcamp Integration team.
Dolby Atmos masters being heavy files, a specific pricing for storage and deliveries applies for this type of master file. Please get in touch with your Labelcamp commercial representative if you have any questions regarding this pricing.
Apple Digital Masters
Apple Digital Masters (ADM) can be sent to Apple by uploading the 24-bit Apple Digital Masters to the product and filling out the ‘Sound Engineer Email’ field with the email address of the relevant mastering studio, under in the ‘Apple Digital Master’ section of the General Information tab of the product. This address must be registered with Apple’s ADM program.
16-bit standard masters and 24-bit ADM masters can both be uploaded to the same product. ADM masters also don’t require ISRCs different from the standard masters.
For more information on Apple Sound Engineer certification, please get in touch with your Apple representative.
The total weight of a product – masters and visual assets included – should not exceed 50gb to guarantee its deliverability
Add Lyrics
It is possible to add lyrics in Labelcamp, however, some rules must be respected:
I - Spacing, structure and capitalisation
Spacing. Lines within a single verse or chorus must be single-spaced. Section or stanza breaks must be indicated with a double space.
Capitalisation. You must begin each line with a capital letter.
Punctuation. Do not use full stops or commas at the end of any line or section. Question marks and exclamation points should be included at the end of a sentence whenever appropriate.
Italics of bold text. Do not use italics or bold text.
II - Lyrics
Lyrics must match the audio. That is to say that you shall not include text that is not audibly present such as section headers or the vocalist's name. Please ensure you:
Transcribe repeated lines and choruses
Do not denote repeated choruses using “Chorus 2x.”
Do not include section headers such as Intro, Verse, Chorus, Hook, or Outro
Transcribe background singers, hushed vocals and sampled content in parentheses if they contribute to the content of the song
Contractions and slang are authorized. All explicit language must be transcribed as it is heard in the audio.
When providing lyrics for the clean version of a song when an explicit version is also available:
If only a portion of a word has been removed from the audio, include what is audible and replace each omitted letter with an asterisk, i.e. f**k, c**t, pr*ck
If an entire word has been clearly edited or removed from the audio, substitute the word with four asterisks
III - Example
I'm giving you a night call to tell you how I feel
(We'll go all, all, all night long)
I want to drive you through the night, down the hills
(We'll go all, all, all night long)
I'm gonna tell you something you don't want to hear
(We'll go all, all, all night long)
I'm gonna show you where it's dark, but have no fear
(We'll go all, all, all night long)
There's something inside you
It's hard to explain
They're talking about you, boy
But you're still the same
There's something inside you
It's hard to explain
They're talking about you, boy
But you're still the same
Create a Compilation
You have two ways to create a compilation, either by adding single tracks coming from different existing releases or by adding an entire existing release.
Add existing tracks
At the top of the tracklist of each volume, a "+" icon allows you to add new tracks. Move your cursor over it and choose "Track from my catalog".
A new window will then open, where you can search your existing track catalog and select the track to add.
Add an entire existing album
You can also create a compilation using an existing release by clicking on the "Add an existing release" button.
A new window will then open and allow you to choose among all validated releases.